Sunday, December 4, 2011

Using Models

I had a difficult time deciding which lesson to do.  I do several lessons using models, but I wanted to do something new.  I found a model that demonstrates seafloor spreading.  My eighth grade students are currently covering space science, so I asked for volunteers from my seventh grade math class.  I got seven female volunteers.  The lesson went very well.  I think working in a small group allowed the students to express ideas freely.  We looked at animated models and then made our own.  Students really understood the process once they made their own models.  The models made it very clear that crust closest to the mid-ocean ridges is younger than crust farther from the ridges.  Students were so excited about the lesson they said that if there were more opportunities in the future, they would like to participate.  We really did not have any problems with the lesson.  Students did have a suggestion for making the model more efficient.  They suggested using legal size paper for the erupting seafloor so it would be easier to manipulate. 

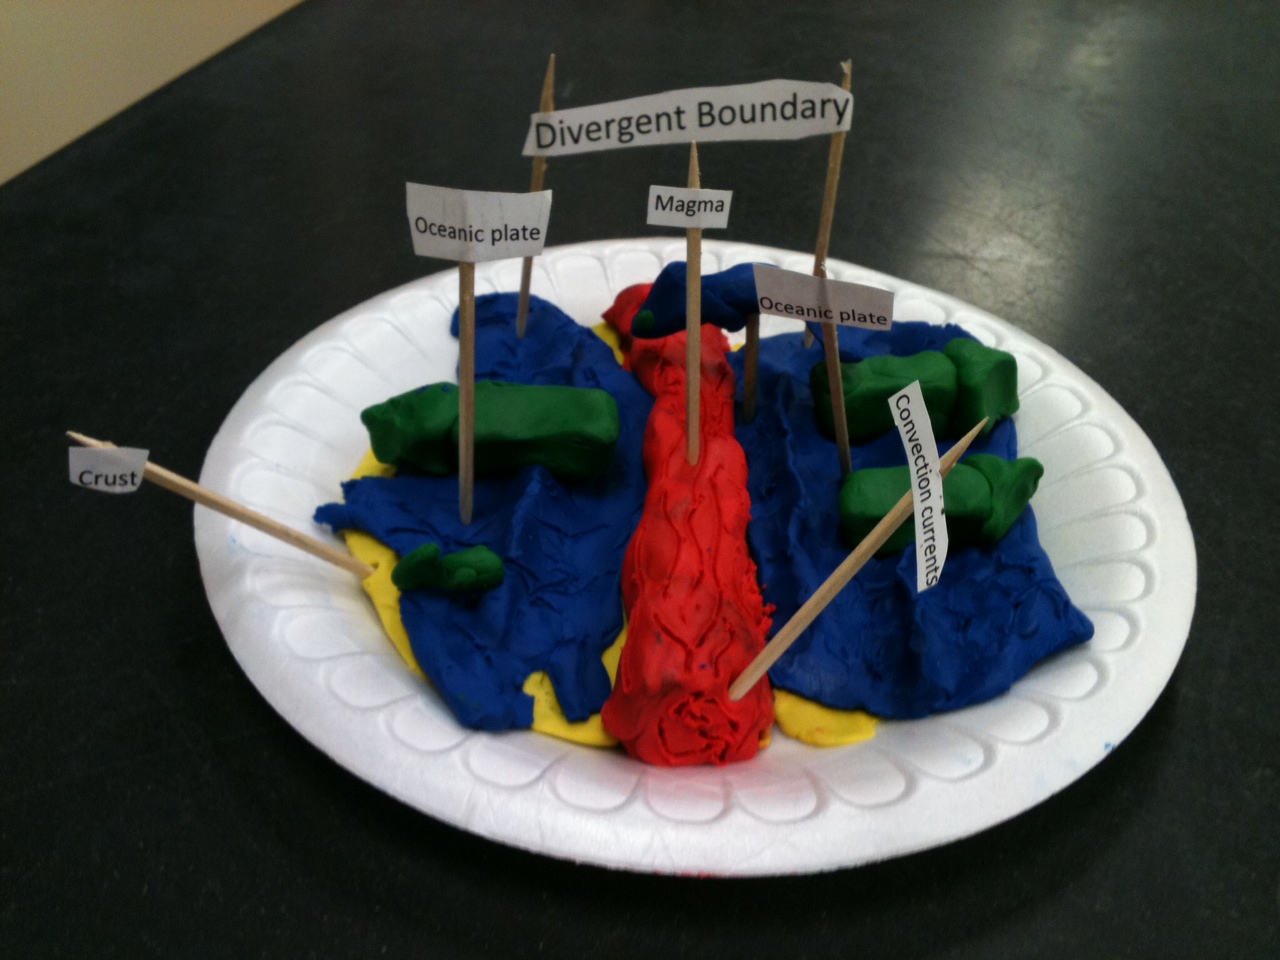
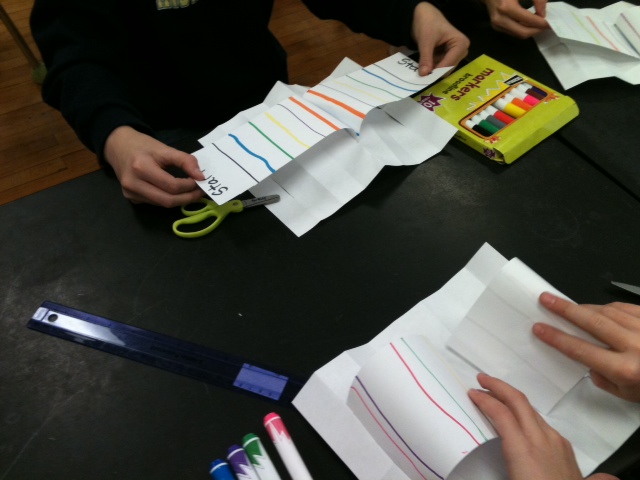
I hope everyone else had a positive experience with their lesson plans.  Below are two pictures of the models we made.


Sunday, November 20, 2011

Natural Disasters

In my classroom I have a book about natural disasters.  What is unusual about the book is that it measures 3’ x 2’.  My students call it “Big Book”.  It is interesting to see students’ reactions when they look at the devastation caused by natural disasters.  In the eighth grade our curriculum does not include weather, but it does include earthquakes.  I use the book to show pictures of past natural disasters.

Although weather is not in our curriculum, I believe it is important for my students to be citizens of the world not just of the city where they live.  When a natural disaster occurs, I ask my students if they have heard or read about it.  Usually only about 1/3 of the students say they know what I am talking about.  This year I am using interactive science notebooks (ISN) for the first time.  While considering this blog post I decided that I will have students express their thoughts and feelings about natural disasters in their ISNs.  When we have class discussions, there are some students who are hesitant to verbally express their feelings.  Writing in their ISNs gives every student the opportunity to respond.  Some writing prompts may include, “What do you know about the science behind this natural disaster?”, “What do you think we need to do to prepare for these types of events?” and “How can be help victims of natural disasters?” Bringing in a speaker from the American Red Cross might be a way for students to hear first hand accounts from someone who has helped others during a natural disaster.

I am proud to say that our school does reach out to the community and the world.  We recently made Christmas shoe boxes for children in Haiti and collected canned goods for local families in need.  Expanding students understanding about their responsibilities as citizens of the world is one way to make the world a better place for all of us.

Saturday, November 12, 2011

Where Freshwater Meets Saltwater

Here is a picture of the inquiry "Where Freshwater Meets Saltwater."  I did this with 7th grade students without too much mess.  If you would like to use this with younger students, I would suggest doing it as a demonstration.  I left it on my desk for several days because the whole school was talking about it and other students and teachers stopped in to see it.  It is a great way to talk about brackish water and density.

Saturday, September 24, 2011

Ask A Scientist

Well......I guess everyone knows by now that Ask A Scientist takes quite some time to respond to questions.  Actually, I had a difficult time even submitting my question.  By the way, my question was, "How is a person's DNA affected if he/she receives an organ or bone marrow transplant."  I tried several times to sumbit my question while using Internet Explorer.  Each time the screen timed out before the question was submitted.  I finally tried using Safari, and it worked right away.

Considering there is so much information on the web, and the amount of time it takes to get an answer back, I am not sure that Ask a Scientist is something I would use with my students.  There are sights (like NASA) where you can partner with an engineer or scientist.  They will work with you throughout the school year to answer questions or direct you to places where you can find answers.  I think this is a much better arrangement for my middle school students.

Thanks to a Walden classmate, Kelly Roberson, I found the answer to my question.  If you would like to know the answer, just go to  http://www.thetech.org/genetics/ask.php?id=208  Thanks Kelly!

Have a great week!

Sunday, September 11, 2011

Web 2.0 Exploration

It is hard to believe how many tools there are on  the web!  I could have spent all day viewing what was available.  The two tools I selected to review are Prezi and Museum Box.  I liked both pieces of software.  Another web tool I found this summer allows you to create cartoons.  I used it for my handouts for the first day of school.  I told my students we would be using it in class.  They were very excited.  Here is that website:  MakeBeliefsComix.com.  Give it a try!

Feature
Prezi
Museum Box
Ease of Use
From my initial experience the software seems fairly easy to use.  It is not as user-friendly as some software I have used.  You have to remember were all the features are. 
With practice I am sure I will get to know more complex features.
This software seemed very easy to use.  You do not have to remember so much to begin making a box.  The software guides you through the process.  This might be a good software to use with my students.
Features
Theme wizards, ability to borrow from editable prezis, ability to add URLs.

The software creates a box.  You decide the number of slots in the box.  You pull out each box or cube and decide what to put on each face.  You can put text, video, or pictures.
Reliability
Having never used Prezi until now, I spoke with several people who use it.  They say it very reliable and they like the fact that you do not need the software to show the presentation.
In order to use this software you have to register your school.  If your students submit work, it may take up to five days until you view it.  This would probably not be good for our class presentation.
Training
Tutorials and manuals available and easy to use
There is a brief tutorial at the beginning, and use the help menu as you go along.
Equipment Requirements
Prezi’s website says you can run prezis from most contemporary computers.  Browsers supported include (Internet Explorer 7 and above, Firefox 3 and above, Chrome, Safari, Opera)
The website supports the following browsers for Windows:  Internet Explorer, Netscape Navigator and Mozilla Foxfire.  You also need Adobe Flash Player, Adobe Reader and Microsoft Word.
Collaboration
Easy to collaborate or file share
You can view others presentations but you cannot share files.
Cost
Free version for teachers
It is free for students and teachers.
Accessibility
Accessible from home and school
Accessible from home and school.
Multi-media capabilities
Can imbed photos and videos from YouTube
Can imbed pictures, photos, and videos.
Motivational Factors
After viewing several of the prezis on the website I found the presentations to be professional and interesting to watch.  I think you need to be careful not to have so much movement that your audience experiences motion sickness!
I viewed some of the museum boxes on the website.  They were very interesting, and I think they would be fun for students to create.


Just as a note, my brother is the director of career services for a local university.  He uses Prezi all the time.  He said it is really easy and fun to use once you get the hang of it!  I am looking forward to seeing what software others have reviewed.

Have a great day!

Sunday, June 12, 2011

Conservation of Energy & 21st Century Skills

The topic I chose is the law of the conservation of energy.  Basically, the law states that although energy can change forms, it cannot be created or destroyed.  This law touches all parts of science so it is important for students to have a thorough understanding of it.

Websites

My favorite website to use with my students is called Powering our Future.  It can be accessed at http://www.poweringourfuture.com/students/index.html.  This website provides fifteen energy transformation animations, information about bioenergy, and careers that deal with energy.

Another favorite website is The Physics Classroom.  This address takes to you an example of a rollercoaster http://www.physicsclassroom.com/mmedia/energy/ce.cfm.  Students really enjoy the animations on this website.

During my search, I found this website http://galileo.phys.virginia.edu/Education/outreach/8thGradeSOL/EnergyBallFrm.htm which was developed by the University of Virginia Physics Department.  It has a variety of experiments to use with students to demonstration the conservation of energy.

Activity

I have used the Powering our Future website with my students.  First, we discuss the different forms of energy.  Students like to give examples.  Sometimes we even play charades to guess which example a group of students is trying to demonstrate.  Next, we list examples of energy transformations in different branches of science.  For example, someone may suggest that in the life science field, we convert chemical potential energy (food), to kinetic energy (running a race).  At this point we go to the computer lab to explore the website.  I have students go to energy transformations link.  Students work independently and go through each of the fifteen animations to see if they can answer the questions.  After they are done, they compare answers with their group.  Next, students explore the bioenergy link.  Finally, we explore the energy conservation careers link.  When they are finished, students share the career that most interested them from the list.  If time permits, students do further research on that career.

Challenges

Probably the biggest challenge I face when using this technology is getting time in the computer lab.  We have two computer labs in our school, but one is primarily used for tech classes.  The other is available for everyone; however, our language arts department seems to sign up for a great deal of time which prevents others from getting to use it.  Our science lab does have some computers but not enough for all students in a class. When I use this lab, I must have two activities going on at the same time.  We usually take two days in the lab.  One day half of the students work on the computer assignment and half work on a lab.  The second day we switch.

Conclusion

I believe it is important for students to have 21st literacy skills.  Having students learn while using technology is an important part of my classroom curriculum.  I am fortunate enough to have a SmartBoard which allows my students to have access to the Internet on a daily basis; however I really do like them to have a chance to explore with technology on their own.

Sunday, May 29, 2011

Heat Transfer Experiment

Material Selected

The materials I used for the heat transfer experiment were aluminum foil, a paper towel, packing foam, and paper insulation.  The reason I chose them was because the directions said chose some materials you think will work well and some you think will not.  I thought the paper towel would not work well, but I thought the others would.  I used a laser thermometer because the thermometer in my science kit was broken.

Results

The following are my results

Insulator
Beginning Temperature
Ending Temperature
Temperature Change
packing foam
67.8°C
49.8°C
-18°C
aluminum foil
66.9°C
50.1°C
-16.8°C
paper towel
62.3°C
44.1°C
-18.2°C
insulation paper
60.6°C
43.4°C
-17.2°C


I found that the foil did the best job and the paper towel performed the worst.  I guess I should have known the foil would do the best since it is used to cover food to keep it warm.  I think the paper insulation would have worked better, but I could not get it to form a tight seal around the mug.

Similar Experiment for Students

To make this experiment more interesting for students, I think I would do two things.  First, I would let students choose the material they want to test.  I find that when students are given a chance to think creatively, they usually do a great job and come up with ideas.  Next, I would make it a contest to see who could come up with the best idea.  My students are very competitive and seem to be more enthusiastic when they are racing against each other.

I might also borrow ideas that I read from our discussion.  We could see which group could devise something to keep an ice cube from melting the longest.  This could be relevant to students’ lives because they bring their lunches, and they could benefit from finding ways to keep cold things cold.

Another way to conduct the experiment would be to ask local contractors to provide samples of insulation material.  We could test them to see which ones would work best with the mug experiment or the ice cube.

Student Learning

As with any activity we do in class, I like for my students to see that science touches so many parts of their lives.  Also, I like them to work like real scientists and to do things that have real-world applications.  Without theses applications, it seems more like we are just “killing time” than we are seeing how science is relevant to their lives.

Sunday, May 15, 2011

Guided Inquiry - Working with Pendulums

Does the mass of an object affect its momentum?  One way to test this idea is to experiment with pendulums.  The experiment I chose was to find out if a lighter or heavier pendulum comes to rest more quickly.  In order to complete this activity, I engaged the help of my husband and son.  The first thing we had to do was find a place to hang the pendulum.  As a family, we enjoy doing experiments and building things so we utilized two eyehooks that are in our basement ceiling.  We used a spool of string that has a kite hook at the end.  We selected washers with three different masses.  We confirmed the mass of the washers by using a digital scale.  The first challenge we encountered was that we made the string too long.  The pendulum was swinging for a very long time.  We decided to shorten the string to two feet from the ceiling.  The next problem we encountered was deciding what constituted the pendulum stopping.  After a few test runs, we realized that the pendulum could swing for a fairly long time.  We decided to put a box under the pendulum.  On the box we drew a circle with a three inch diameter.  We decided that once the pendulum was swinging within the circle we would consider that the end of the trial.  Each time we did the experiment we pulled the pendulum back to a height of fifty-seven inches.  We did this so that we were sure to test only one variable, the mass of the pendulum.  Here are a few pictures of our set up.


As we put the experiment together, we discussed possible outcomes.  The two ideas we came up with were that the pendulum with greater mass would have more momentum and would therefore swing longer.  The other idea we had was that the washer with a greater mass would be more affected by gravity which would cause it to swing a shorter period of time.  After we tested the three pre-selected washers and then we decided to put all three washers on the hook to see what would happen.  The following is the data we collected.

Weight of Washer(s)
Swing Time
59 grams (three washers)
7:57 minutes
34 grams (one washer)
4:58 minutes
20 grams (one washer)
4:11 minutes
5 grams (one washer)
2:21 minutes


From our data we discovered that the greater the mass of the pendulum the longer the swing time.   We decided that the mass of the pendulum affects its momentum. 
           
If I were going to use this experiment in my class I would set up the pendulum bars, but then I would provide students with lots of different items they could use to answer the question.  If I wanted to make this experiment relevant to my students’ lives, I would not have them use pendulums.  We would discuss how they think mass and momentum are related.  I would then have them design an experiment based on something in their lives to test their ideas.  Of course, safety would be crucial to these experiments.

Allowing my students to experience the satisfaction of finding their own ways to answer a question is important to me.  For some time, I have been considering ways to improve my students’ problem-solving abilities.  I find that many students become easily frustrated when they have to answer questions that are beyond the knowledge level.  I think giving students a question and giving them the freedom to design a way to answer the question will encourage students to be creative and resourceful.  Hopefully, the feeling of pride that comes from designing their own experiment and finding answers to their questions on their own will encourage them to become more tenacious when faced with a problem.  Another goal for using this type of inquiry is that students will see the science concept at work instead of just reading about it in a textbook.

Sunday, April 10, 2011

Inquiry Lesson - How are Landforms Created?

For my structured inquiry, students investigated plate boundaries.  Given a specific set of questions, students began by independently researching information about plate boundaries.  Students recorded information in their science journals.  Next, students were placed in groups.  Together they shared their research and corrected misconceptions.  After each group felt they had thorough and accurate data, they electronically completed and submitted a data chart.  The next step of the project was to choose one boundary type and make a model of a landform that occurs at that boundary.  Students completed their models in groups.  Finally, each group presented a model and lead a class discussion about the landform and boundary where it occurred.

Students were very enthusiastic about this project.  Students really seemed to like the idea of gathering their own information which translated into them taking control of their own learning.  Students also liked the idea of being able to verify their information by working cooperatively with other students.  Of course, students were very excited about making their clay models!  They did such a great job.  The assessments I used included an observation checklist, questioning, journals and grading rubrics.  These assessments allowed me to see student learning and provide feedback.  I felt student learning was evident throughout the project, especially when I listened to groups using new words they had learned from their research.

The following are examples of student work.  The first sample is a completed boundary chart.  This sample shows student learning as all information is provided and all directions have been followed.


The following are pictures of students' models.  These models are an example of student learning because students had to create models of land forms created a specific boundary types.


                                           Volcano formed at convergent boundary.


                                           Sea-floor spreading at a divergent boundary.

I really like that students include convection currents in their models!  They really enjoyed this part of the lesson.  Overall, I am very pleased with how the lesson was carried out, and I am very proud of my students!

Sunday, March 20, 2011

Melting Icebergs

Melting Icebergs Experiment

The experiment we did in the lab “Melting Icebergs,” shows what would happen if the ice at the North Pole melted.  The ice at the North Pole is floating on water so it has already displaced the volume of the ice in the ocean.  If the ice melted, the oceans would not rise. 

On the other hand, the ice at the South Pole covers Antarctica.  If that ice melts it will cause ocean levels to rise.  Scientists believe that Antarctica is covered with about 90% of Earth’s ice which, if melted, could cause the oceans to rise about 200 feet.  Since the average temperature in Antarctica is -37°, most scientists believe that this meltdown will not occur.

If I were doing this experiment with my students I would certainly expect them to spend time researching both sides of the global warming issue.  Although most scientists agree that the atmosphere is warming, they do not all agree on the cause.  A look at ancient climates might be valuable to determine how shifts in climate have occurred in the past.

The other question I would ask my students is, how can we perform a second experiment to model what would happen if the South Pole ice cap melted.

I have had a bad health week so I am signing off for now!  Have a good week!

Sunday, March 13, 2011

STEM Lesson Plan Reflection

This blog was created to allow me to reflect on my experiences as a science teacher and as a graduate student at Walden University.  I welcome your comments and questions.

This reflection is regarding my STEM strategies lesson plan created for my Nature of Science course at Walden University.  The 5 E’s strategy that is:  engagement, exploration, explanation, elaboration, and evaluation is helpful in planning lessons because I helps create a lesson that is complete and considers all parts of the lesson from beginning to end.  It is very similar to the methods I used when I was an undergraduate education major.

Currently, I teach three subject, 7th grade math, 7th grade science, and 8th grade science.  In the past I have also taught 8th grade math.  I am fortunate to have a SmartBoard, so all my lessons are prepared in advance.  Of course, after teaching a lesson, I often go back to change any area where I find student misconceptions.  It is not very realistic to think that a teacher could utilize a template such as the one we were required to use for this lesson plan for every lesson. However, as you get to know your students and as you become a more experienced teacher, you begin to be more successful with engaging students in a new lessons or making sure that you are extending student thinking.  It is never a bad thing to go through the process of completing some formalized lesson plans to ensure that you are not taking short cuts in your classroom presentations.

The lesson plan I created primarily deals with students evaluating Earth’s four systems and how those systems interact with each other.  Students will use the Deepwater Horizon oil spill to help them use a real-world problem for their exploration.  On a secondary level, the lesson deals with how human activity impacts the environment and finally, how we weigh the benefits/costs of things like oil drilling.  The biggest logistical issue I may face in presenting the lesson is getting time in the computer lab for the elaboration activity.  We have two computer labs in our school, but they are heavily used by our language arts department.

Finally, I would like to share two websites that I used to obtain information to use in the engagement and elaboration parts of my lesson.  The websites are:

Smithsonian Education - http://smithsonianeducation.org
Teachers’ Domain - http://www.teachersdomain.org
Smithsonian Education has a variety of interesting lesson plans that meet national content standards.  Teacher’s Domain has a wonderful array of digital media, movies, slideshows, and animations that I often include in my daily lessons.
Thanks for reading my first blog.  As I mentioned before, I welcome your comments!